FIXEDINTEL ACADEMY
A1 ENGINE REPAIR // REFERENCE

BEARING FAILURE LIBRARY

Six classic engine bearing failure modes. Each photo decoded: visual signature, root cause, and the repair scope that prevents the comeback. The reference that turns "the bearing's shot" into a root-cause diagnosis.

A1 STUDY HOME →
HOW TO USE THIS LIBRARY

When you pull a bearing during a teardown, the wear pattern is the engine's confession. Match the pattern to the failure mode, and the diagnosis writes itself — including the upstream cause that has to be fixed before the new bearings see oil. Replacing bearings without fixing the cause is the most common reason engines come back at 30,000 miles.

1 · INSPECT

Photograph every bearing as it comes out. Note the cylinder, the journal, and which half (upper vs lower).

2 · MATCH

Compare the pattern to the six modes below. Most failed bearings show ONE dominant pattern, sometimes two stacked.

3 · FIX THE CAUSE

Each mode has an upstream cause. Address that before you button it up — or the new bearing fails the same way.

SIX CLASSIC FAILURE MODES
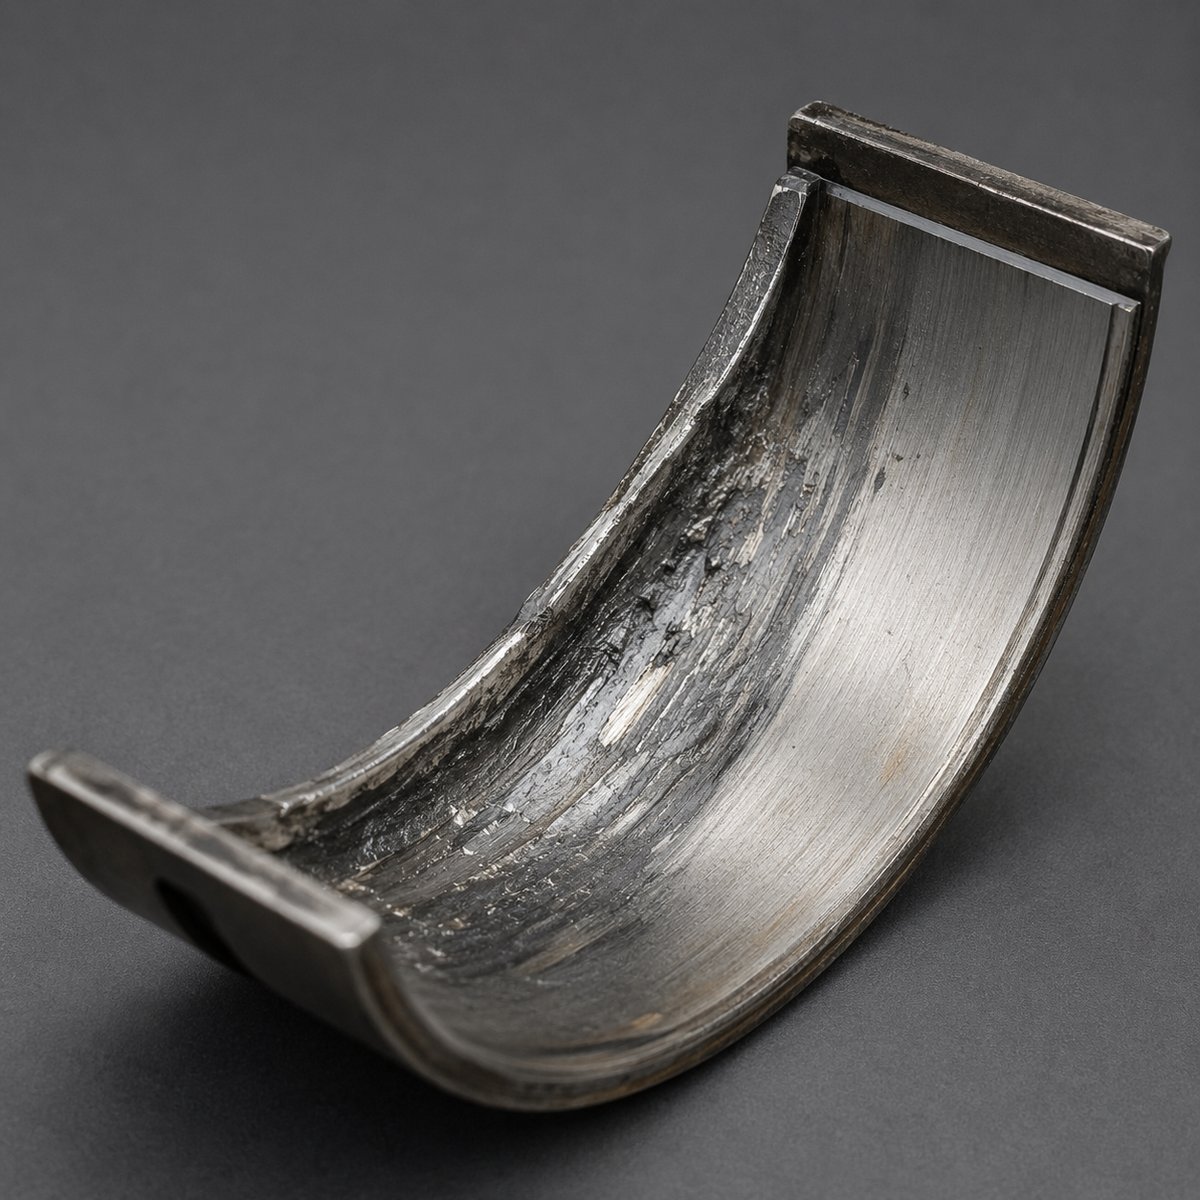
Bearing showing overload damage — surface smearing and one-sided deformation

MODE 01 · OVERLOAD

Critical

Smearing & one-side wear

VISUAL SIGNATURE

Heavy smearing concentrated on one side of the bearing shell. Surface looks pushed and deformed, with a raised edge along the overloaded zone. The original cross-hatch machining is obliterated where the damage is heaviest. The opposite side often looks nearly new.

ROOT CAUSE

Cyclical mechanical overload beyond the bearing's design rating. Sources: detonation (knock), pre-ignition, severe over-revving, hydrolocking that bent the rod, a damaged journal pushing the load to one edge, or excessive bearing-to-journal clearance letting the shaft hammer.

REPAIR SCOPE

Bearings and journals must both be inspected. Check rod straightness with V-blocks. Investigate the load source — pull plugs and look for detonation signatures on pistons. If the engine knocks under load, do not reassemble until you find why. New bearings against a bent rod or a knocking engine fail in days.
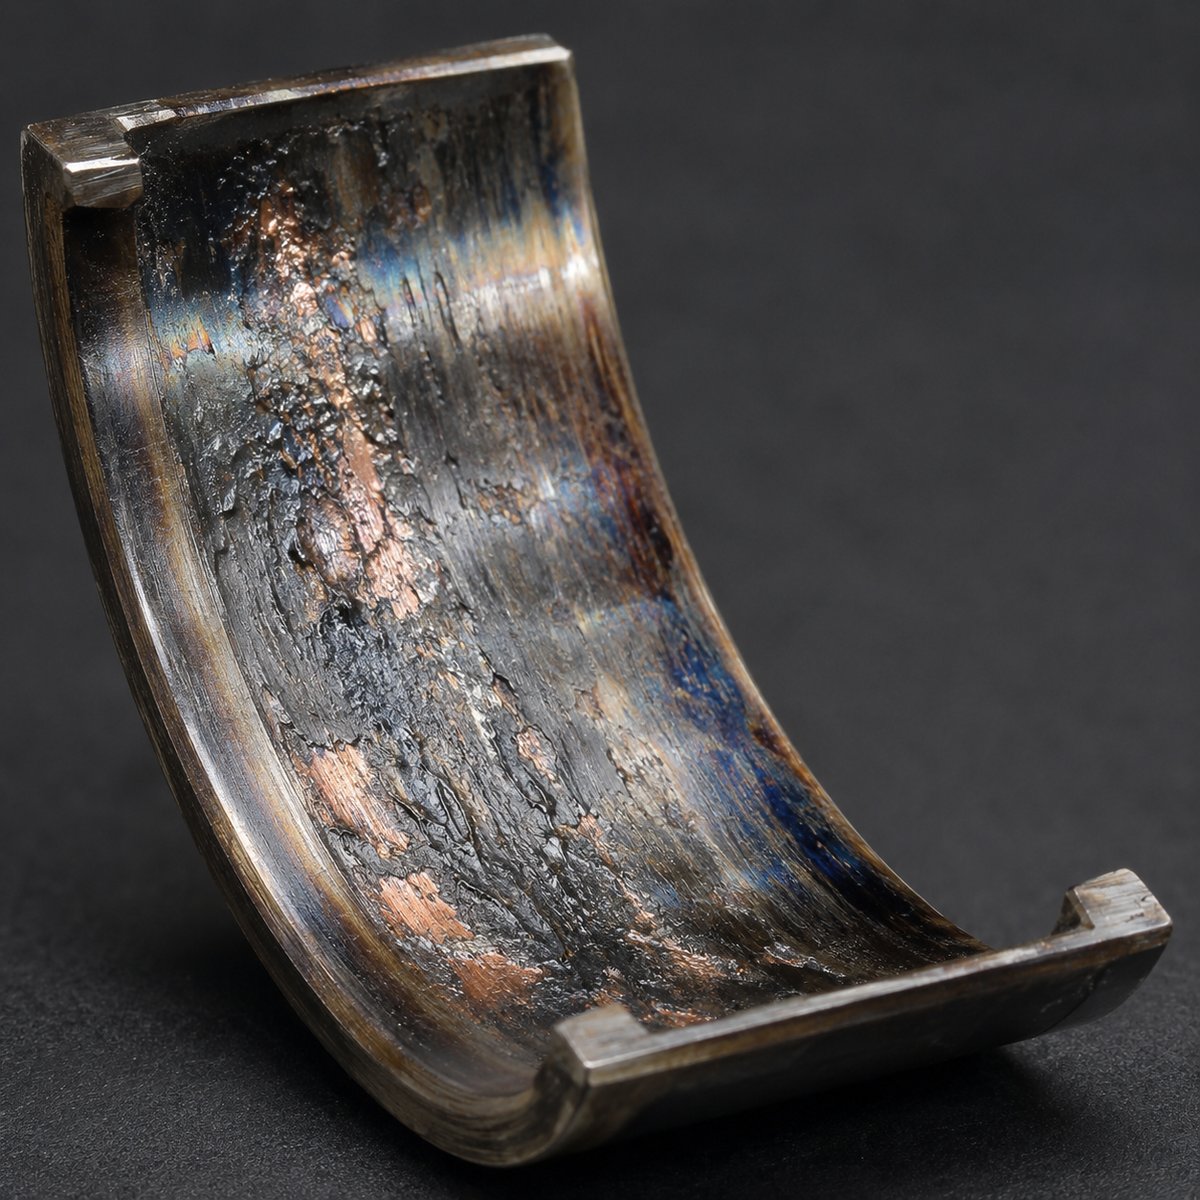
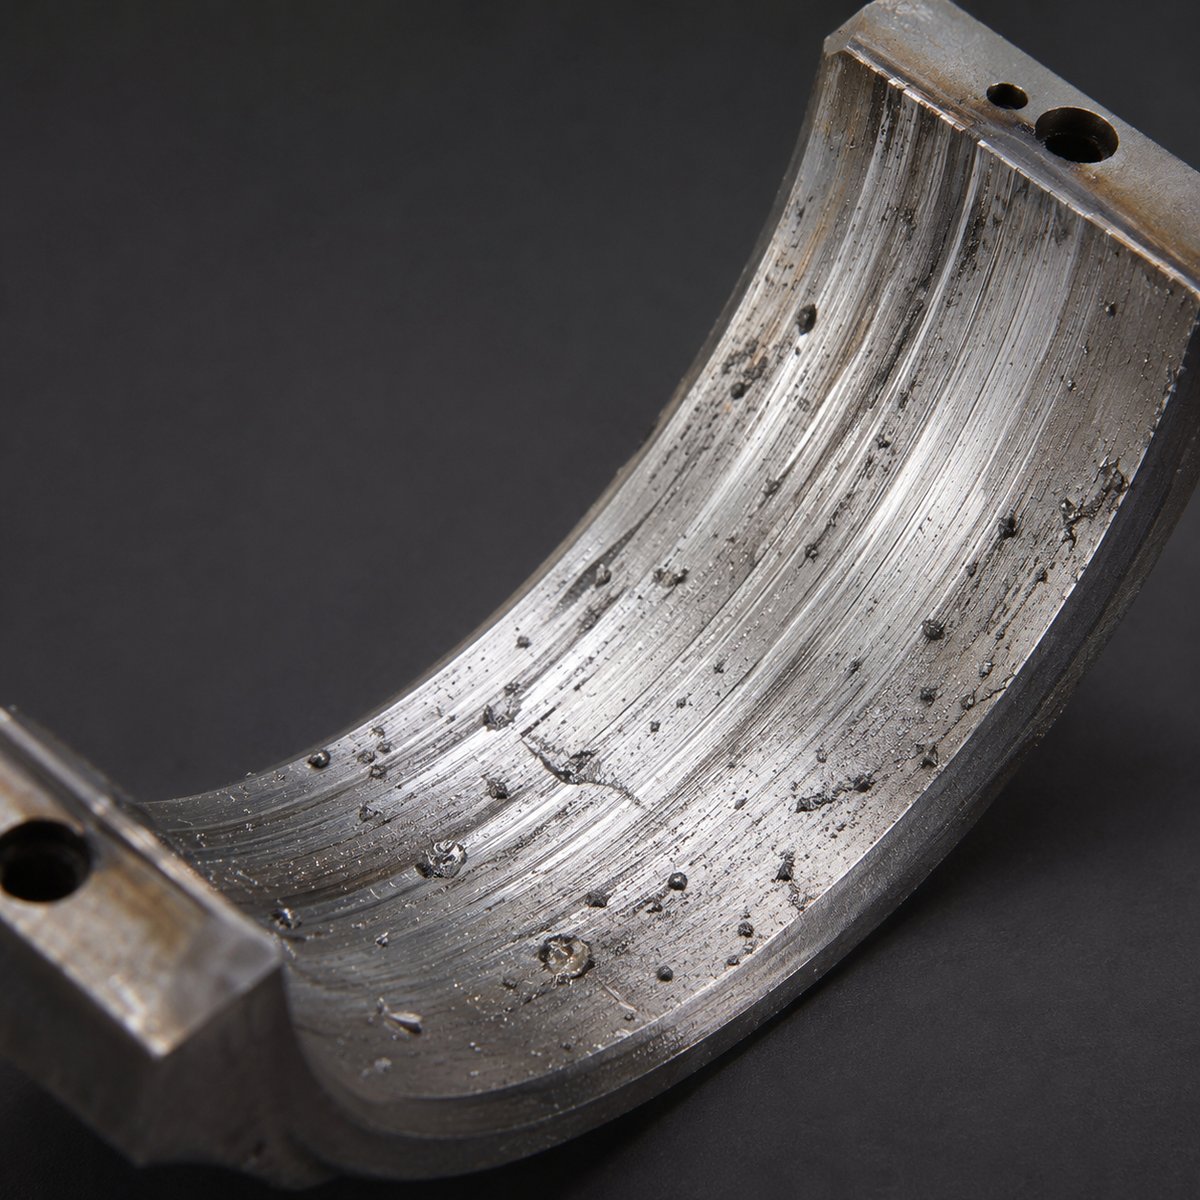
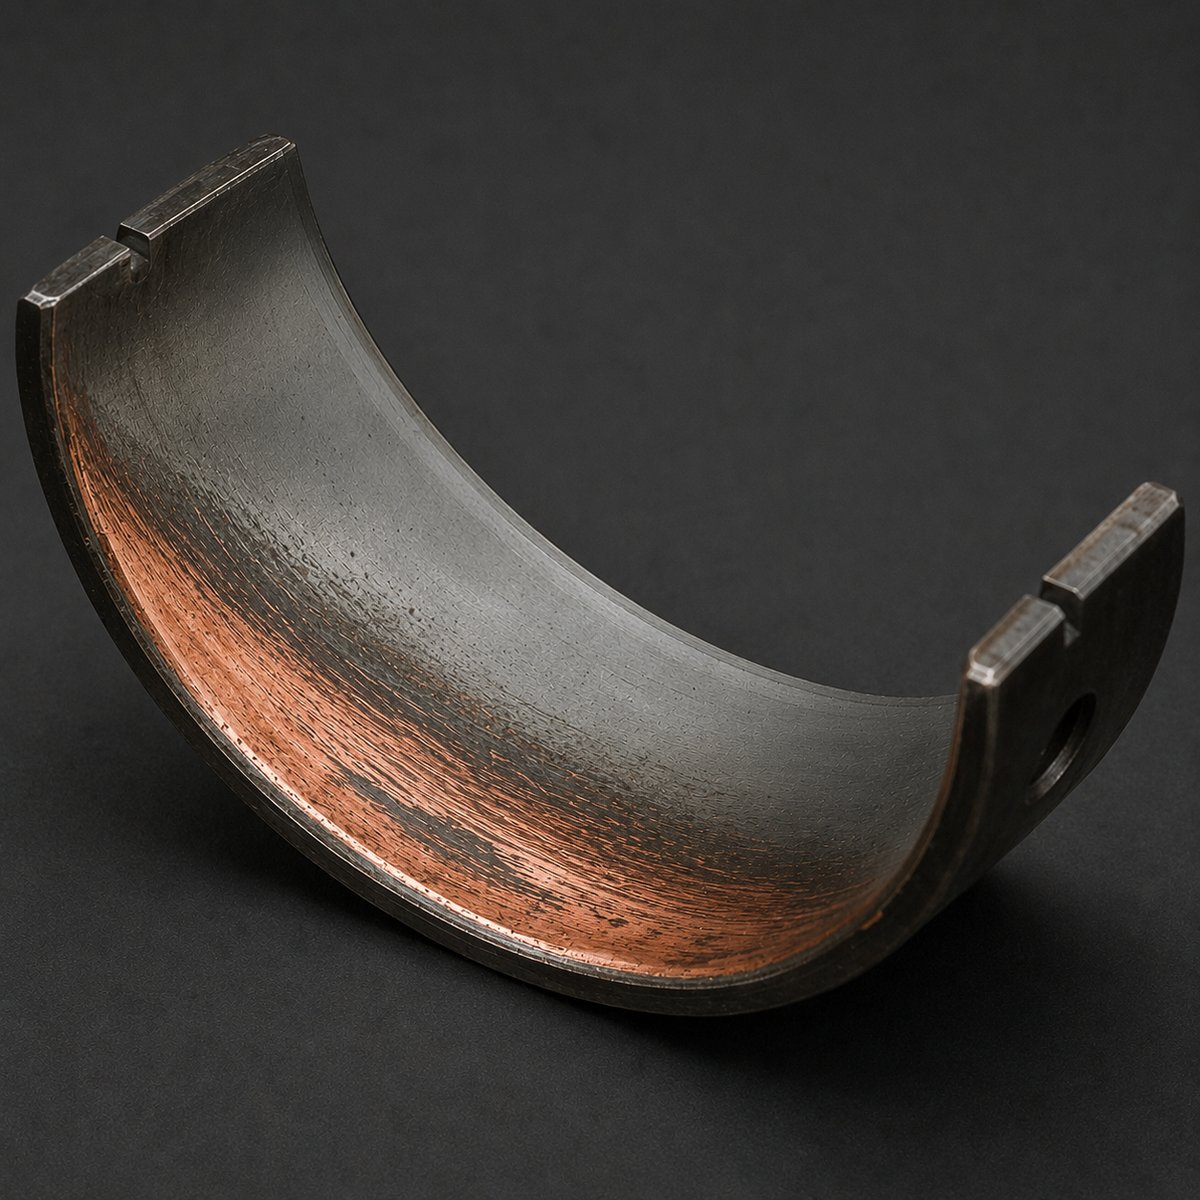
Bearing showing oil starvation damage — heat discoloration and exposed copper underlayer

MODE 02 · OIL STARVATION

Critical

Heat blueing & copper exposure

VISUAL SIGNATURE

Rainbow heat discoloration — straw yellow through blue to deep purple — across the entire bearing surface. Babbitt overlay is wiped or melted, exposing the copper-tin underlayer in irregular patches. Damage is uniform across the running surface, not localized.

ROOT CAUSE

Oil film collapsed — no hydrodynamic separation between bearing and journal. Sources: low oil level, oil pump failure or wear, plugged pickup screen, blocked oil galley, oil pressure relief valve stuck open, prolonged dry-cranking after rebuild, broken or burst oil cooler line, or wrong-viscosity fluid at operating temperature.

REPAIR SCOPE

Bearings, pump, pickup, galleries, and oil cooler all suspect. Pressure-test the entire oil system. Inspect the pickup screen for debris. Check pump rotor clearances against spec. Verify relief valve function. Confirm correct viscosity for climate and load. Do not reassemble until oil pressure is verified at all RPMs at operating temperature.

Bearing showing contamination damage — embedded particles and circumferential scoring

MODE 03 · CONTAMINATION

Serious

Embedded particles & scoring

VISUAL SIGNATURE

Hard particles embedded in the Babbitt surface — visible as dark specks and pits. Parallel circumferential grooves from particles that didn't embed but rolled instead. Multiple deep scratches across the running surface. Damage is distributed, not concentrated.

ROOT CAUSE

Foreign material in the oil supply. Sources: skipped or missed oil filter changes, ruptured or bypassed filter element, debris from a previous mechanical failure (gear tooth, broken ring), dirty assembly during rebuild, unfiltered top-up oil, machining swarf left during a repair, or coolant intrusion creating sludge that particulates.

REPAIR SCOPE

Flush the entire oil system. New filter, new oil, fresh pickup screen inspection. Cut open the old filter and examine the media — particle type tells you the upstream source (gear, ring, valve, gasket). If contamination came from a prior failure, you must identify and fully repair that source before bearings will survive.

Bearing showing misalignment wear — diagonal wear band across the surface

MODE 04 · MISALIGNMENT

Critical

Diagonal wear band

VISUAL SIGNATURE

Wear runs diagonally across the bearing surface — heavy on one edge, light or untouched on the opposite. The wear band is angled, not straight across. One end of the bearing is worn to copper; the other end retains original Babbitt.

ROOT CAUSE

Bearing and journal are not parallel under load. Sources: bent connecting rod, twisted crankshaft, warped block deck, improperly torqued main caps, block damage from previous failure, dropped block on the floor before machining, or a bearing housing not align-honed after a major repair.

REPAIR SCOPE

This is a measurement problem. Measure rod side-to-side and end-to-end straightness on V-blocks. Check crankshaft straightness on the bench. Inspect block main bores for alignment with a long straightedge or align-hone bar. Do not reassemble until you've measured the geometry — new bearings will wear into the same diagonal pattern within hours.

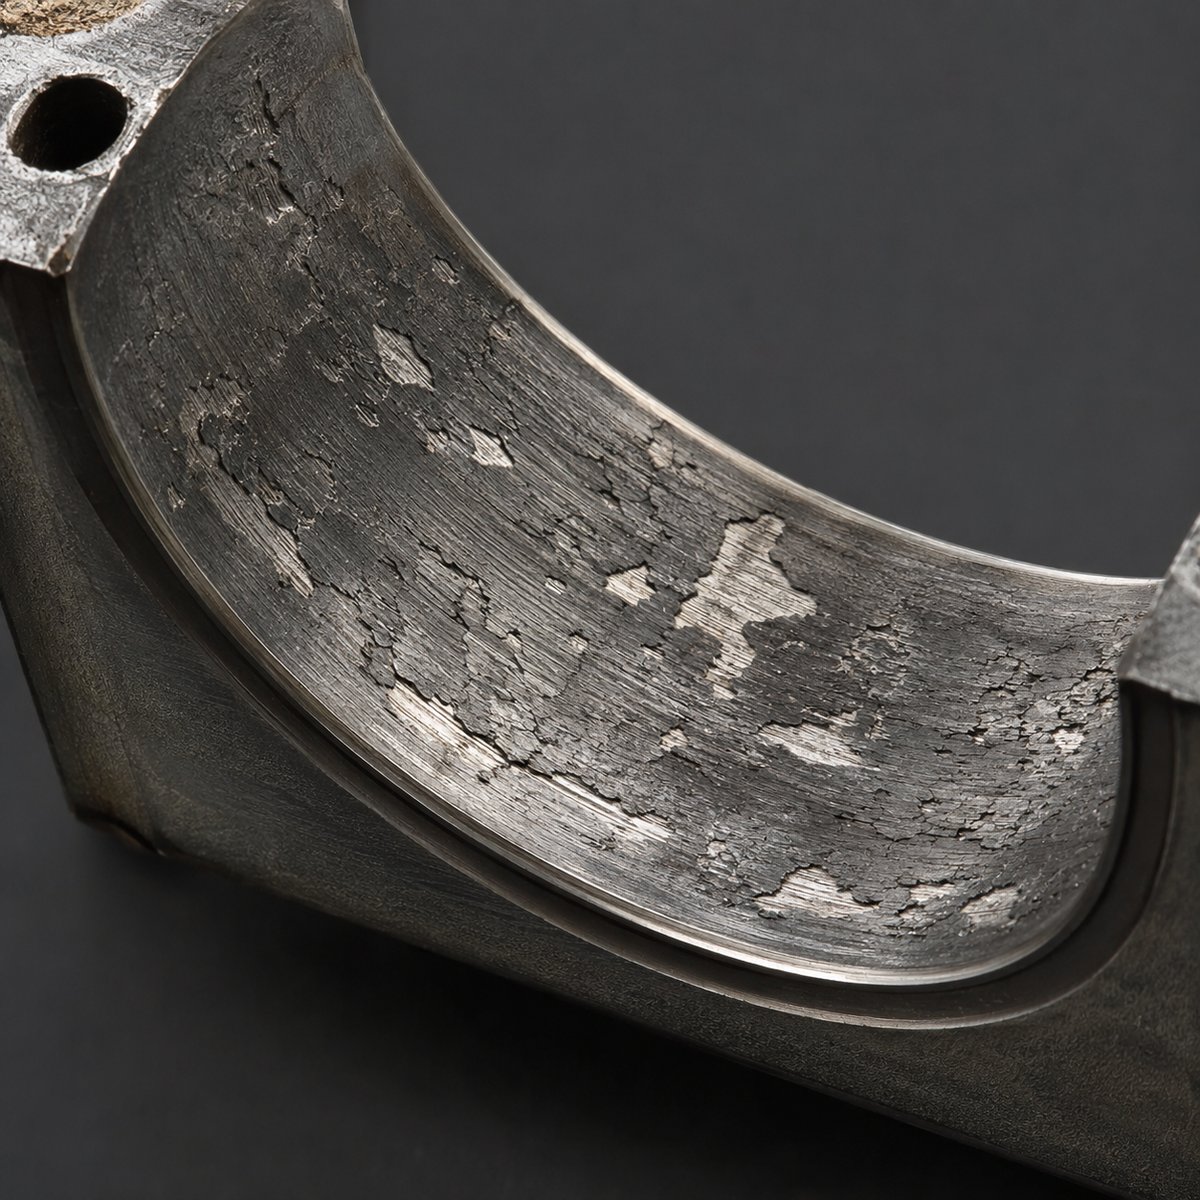
Bearing showing fatigue spalling — mud-cracked surface with flaked material

MODE 05 · FATIGUE SPALLING

Serious

Mud-crack flaking

VISUAL SIGNATURE

Surface looks like dried mud — irregular cracks and small flakes where the overlay material has lifted away, exposing underlayer in random patches. Damage is distributed but localized to the loaded half of the bearing. Edges of each flake are sharp, not smeared.

ROOT CAUSE

Cumulative cyclic stress that finally exceeded the overlay's fatigue limit. On a long-mileage engine this is normal end-of-life wear. On a low-mileage engine it points to chronic overload — sustained high torque, extended towing, repeated detonation events, or operating loads beyond design (tuned cars, work trucks past their rating).

REPAIR SCOPE

Replace bearings. If low-mileage, address the duty cycle — talk to the customer about load and how they drive. Consider tri-metal (heavier-duty) bearings for tuned or work applications. Inspect rods and crank for straightness — fatigue can accelerate with even minor misalignment. Verify oil viscosity matches load.

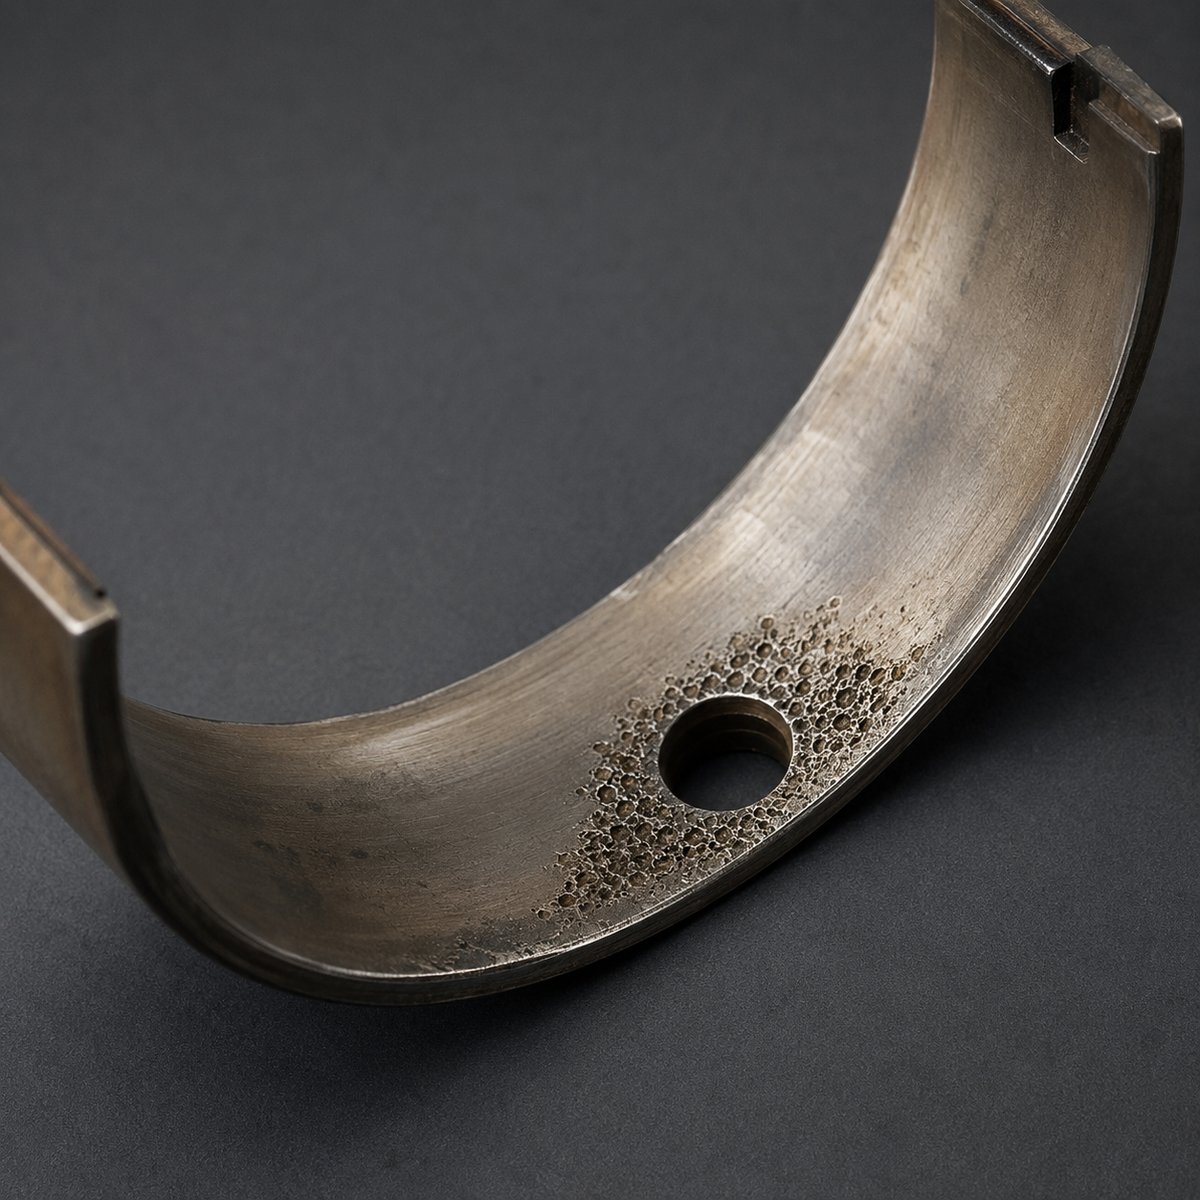
Bearing showing cavitation erosion — honeycomb pitting near oil supply hole

MODE 06 · CAVITATION EROSION

Serious

Honeycomb pitting near oil hole

VISUAL SIGNATURE

A localized honeycomb of small, irregular pits concentrated around the bearing's oil supply hole or oil groove. Pits look like tiny bubble craters. The rest of the bearing surface is often nearly clean. Material has been eroded away, not embedded into.

ROOT CAUSE

Air bubbles or vapor pockets in the oil supply imploding against the bearing surface. Sources: aerated oil from a low oil level uncovering the pickup, leaking pickup tube allowing air ingestion, blown gasket on the pump suction side, sustained high-RPM operation with marginal oil supply, or wrong-viscosity oil too thin to maintain hydrodynamic film at the oil hole.

REPAIR SCOPE

Pressure-test the oil pickup tube assembly for air leaks. Inspect pump suction gasket. Verify pickup is properly submerged at low oil levels (some engines are known for marginal pickup geometry). Check for proper oil viscosity at operating temperature. The new bearings will pit again in the same location if the cavitation source isn't eliminated.

TRAPS TECHS FALL INTO
1
REPLACING BEARINGS WITHOUT IDENTIFYING THE CAUSE

Every failure mode here has an upstream source. Replace the bearings without fixing the source and the new ones fail the same way in 5,000–30,000 miles. The bearings are evidence; the diagnosis is the upstream system. A rebuild that doesn't fix the oil pickup leak, the bent rod, or the missing filter changes is a comeback waiting to happen.

2
CONFUSING OVERLOAD WITH MISALIGNMENT

Both produce one-sided wear, but the patterns are different. Overload runs perpendicular to the bearing axis (heavier in the middle of the load zone). Misalignment runs diagonally (heavier at one end). Confuse the two and you'll go looking for detonation when the real problem is a bent rod, or vice versa. Look at the wear axis carefully.

3
MISREADING NORMAL HIGH-MILEAGE WEAR AS FAILURE

A 200,000-mile bearing with even surface wear and light fatigue patches isn't a failure — it's a normal end-of-life condition. Don't sell a teardown rebuild on a high-mileage engine showing normal wear unless there's another diagnostic reason. Replace the bearings, restore oil pressure, and move on. The customer's wallet appreciates not being charged for problems that aren't.

4
SKIPPING THE OIL FILTER AUTOPSY

Cut open the old oil filter and look at the media. The particles caught there tell you what's wearing in the engine — copper (bearings), aluminum (pistons), iron (rings or cylinder walls), brass (bushings). The filter is free evidence. Skip the autopsy and you miss the second failure mode hiding behind the obvious one.

QUICK REFERENCE · ONE-PAGE SUMMARY

Print this. Stick it inside your toolbox lid.

PatternModeUpstream cause
Smearing, one-side, perpendicularOVERLOADDetonation · over-rev · bent rod · excess clearance
Heat colors, wiped Babbitt, copper exposedOIL STARVATIONPump · pickup · low level · plugged galley
Embedded particles, circumferential scoringCONTAMINATIONSkipped filter · ruptured filter · previous failure debris
Diagonal wear bandMISALIGNMENTBent rod · twisted crank · warped block · loose caps
Mud-crack flaking, loaded halfFATIGUE SPALLINGNormal end-of-life · chronic overload · tuned/working hard
Honeycomb pitting near oil holeCAVITATIONAerated oil · pickup leak · pump suction gasket · viscosity